

Key takeaways
- Save a Bilibili video to the knowledge base, let it download to your computer, then click Decompose on it yourself. You get a topic, a structure template, shots, a per-shot shooting script and a timed transcript, and the transcript text, keyframes, shot MP4 clips and M4A music cues are copied to
decompositions/<title>in the asset library.- For a fifteen-minute explainer, the structure template and the timed transcript are the pieces to keep: first see how it poses the question and builds the argument, then jump by timestamp to the part you want to study. Strong demos, animations and live footage stay in the asset library as shot MP4 clips.
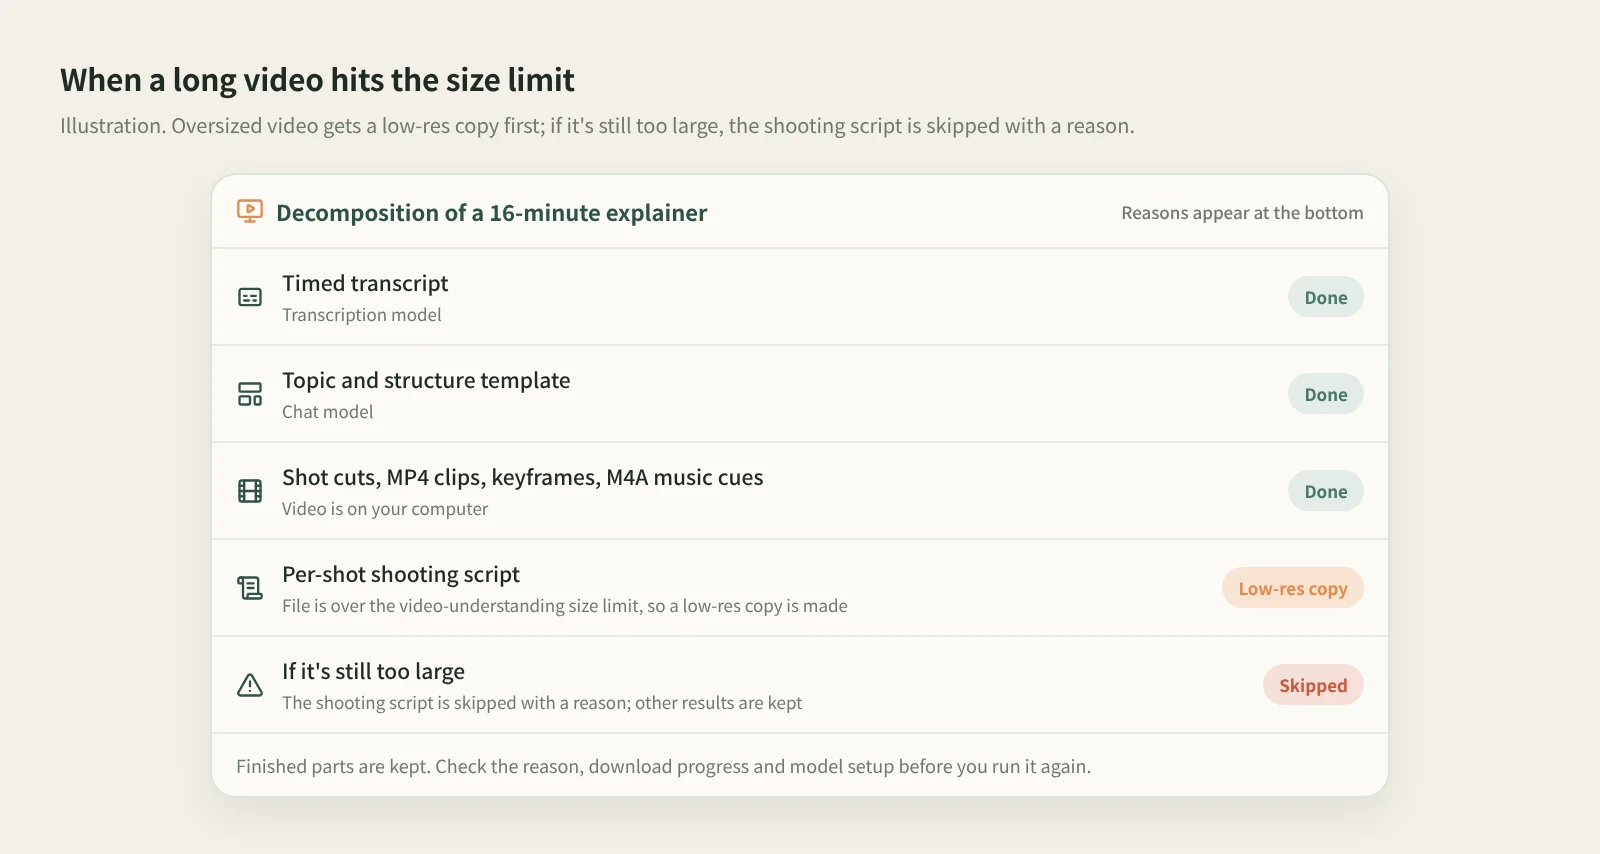
- Long videos can hit the video-understanding size limit. Beav first makes a low-resolution copy; if that's still too large, the shooting script is skipped with a reason and everything else that finished is kept. Decomposition uses model quota. Music cues come from ranges with sound but no speech, so they may include ambient sound; this is not vocal separation.
Explainers on Bilibili often run fifteen minutes or more. One video takes a single idea all the way: how it opens on a question, how it lays out examples, when it cuts to an animated demo, how it lands the ending. All of that took work, and the longer the video, the harder it is to learn from. One viewing leaves you with the conclusion. Studying the delivery means pausing section by section with your notes open.
In Beav, that becomes one Decompose. The video's structure, what each shot shows and the minute and second of every line are pulled out and filed in the asset library, and each clip remembers which video and which time range it came from. Saving is the first step of building a material library; breaking things down is the second. A long video you'd otherwise forget becomes structure and footage you can find again for your next piece.
Who it is for
- Bilibili creators making science explainers, tutorials and reviews who want to see how others organize fifteen minutes of content.
- Social media managers adapting long Bilibili videos into RedNote (Xiaohongshu) carousels or short Douyin videos, who first need the original's line of argument.
- Editors and directors collecting good demo shots, transitions and music as reference for future edits.
How to use it
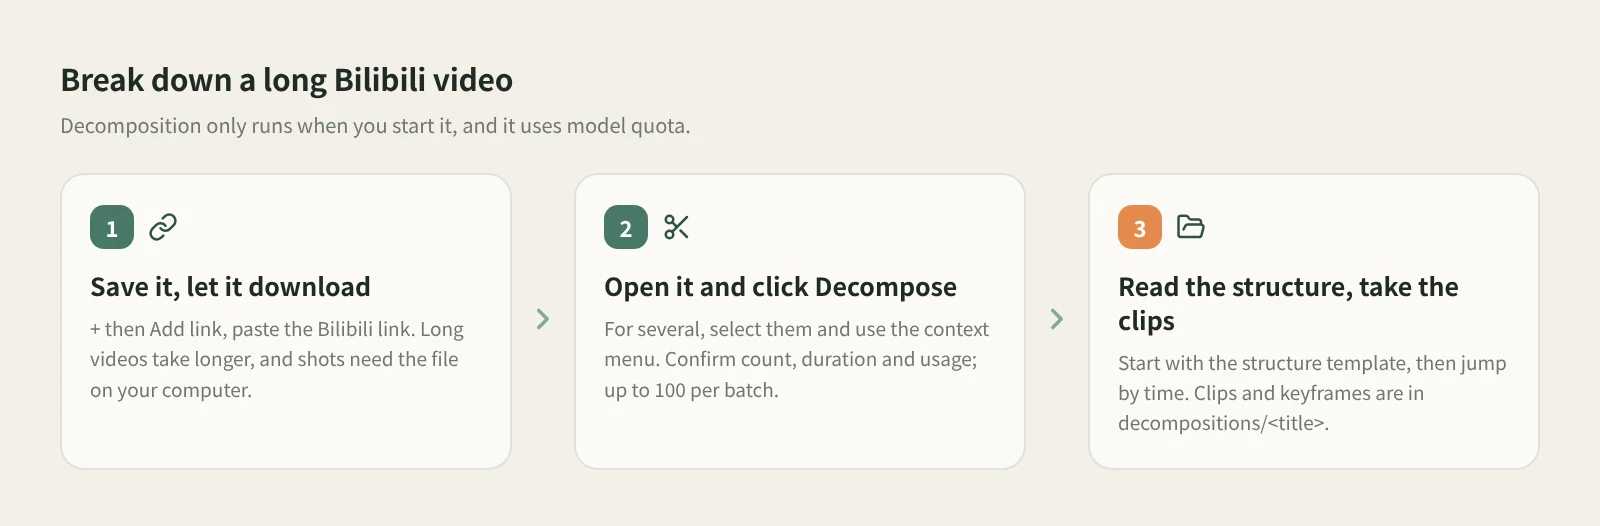
- Save the video first. In the knowledge base, click + next to Knowledge Base, choose Add link and paste the Bilibili link or share text. The walkthrough is in saving Bilibili videos to a reference library.
- Wait for it to download. Long videos are big files, so the card may show Downloading for a while. Cutting shots, making clips and pulling music all need the video on your computer.
- Open the item and click Decompose. To do several benchmark videos at once, select them in the list, open the context menu and confirm the item count, video duration and model usage before it starts. A batch takes up to 100 items.
- Read the structure, then zoom in by time. The structure template shows how the whole video moves forward. To look closer at a part, click a shot thumbnail or timestamp and the video jumps there. If a cut is off, merge the shot into the previous one or split at the playback position; later runs keep your cuts.
- Take the clips from the asset library. Open
decompositions/<title>in the asset library for the transcript text, keyframes, shot MP4 clips and M4A music cues. The topic also goes to the topic center.
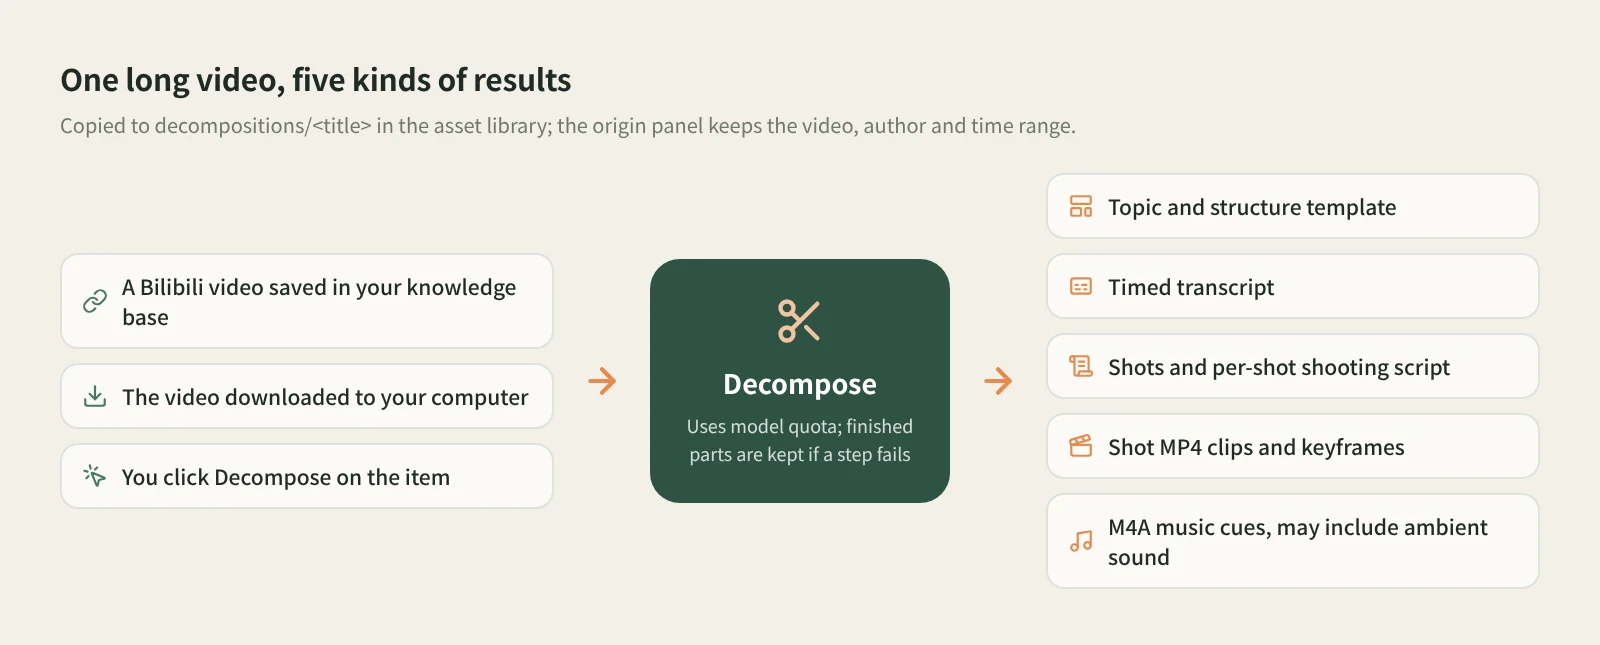
The structure template and topic: see the skeleton first. The easy mistake with long videos is remembering a few great lines and nothing else. The structure template lays out how the video opens, develops and closes, so you can tell whether it starts from what you see or from the principle, and whether the examples come before or after. The topic goes to the topic center, where you can find it later.
The timed transcript: fifteen minutes of talk you can search by time. Every line the creator says becomes text with its own timestamp. When a section reads especially clearly in the structure, find those lines in the transcript and jump back to that moment in the video. Use it to learn the order and pacing of the explanation, then write your own script in your own words.
Shots and the per-shot shooting script: explainers have a visual language too. Talking to camera, screen recordings, animated demos and live footage trade places throughout one video. The shooting script lists each shot in order, with what it shows and how it was filmed. Read it next to the transcript and you see which passages got a demo and which ones the creator carried by talking alone.
Shot MP4 clips and keyframes: footage you can reuse as reference. The video is cut shot by shot, with an MP4 clip and a keyframe for each, filed in the asset library for the next time you make something similar. After you adjust cuts, decompose again to get new clips; old clips are not deleted.
M4A music cues. Beav takes the ranges where there's sound but nobody is talking and saves them as M4A. In an explainer those may be the intro, transitions or animated sections, and they may include ambient sound. Vocals and music are not separated, so listen before you use one.
What uses quota? Saving a Bilibili video through Add link goes through the capture service, which needs sign-in or a configured capture API and consumes quota according to its rules. Decomposition then uses model quota: the transcript, topic and structure, and shooting script rely on transcription, chat and video-understanding models respectively.
How it compares with the usual ways
| Breaking it down by hand | CapCut auto captions | A separate music-ripping tool | Beav Decompose | |
|---|---|---|---|---|
| Strength | Every call is your own, so you understand it best | Captions land on your timeline, great for captioning your own videos | Built for audio; some identify the song or separate vocals | Structure, shot script, transcript, clips and music in one run |
| A fifteen-minute video | A very long session | Fairly quick once imported | Sound only | One click, then wait; a size-limit skip comes with a reason |
| What you get | Notes and screenshots | Caption text | An audio file | Topic, structure template, per-shot shooting script, timed transcript, shot MP4 clips, keyframes, M4A music cues |
| Source | You track it | Lives in the edit project | Usually you track it | Origin panel keeps the video, author and time range |
| Cost | Free, but slow | Per CapCut's own terms | Depends on the tool | Model quota |
If you really want to learn how a creator explains things, breaking the video down by hand is still the surest way, and the structure and script Beav produces only count once you've read them and judged them yourself. For captioning your own footage, CapCut is the smoother tool. If you need the song's name or a clean instrumental, a dedicated audio tool fits better: Beav doesn't identify songs or separate vocals. Beav is for breaking down a batch of long benchmark videos and keeping the results in a library you can trace back to the source.
Limits and notes
- The video has to be on your computer. Items still downloading, or whose download failed, can't produce shots, clips or music. Decomposition only runs when you start it; saving never starts one.
- If results are partial, read the reason. Check the reasons at the bottom of the result, the media download progress and your model setup. If one step fails, the finished parts are kept. Video over the video-understanding size limit is first compressed to a low-resolution copy; if it's still too large, the shooting script is skipped and the reason is shown.
- The structure template describes organization. It tells you how the video moves forward. To get back to a specific part, use the times on the transcript and the shots.
- Running it again won't overwrite your edits. Versions you changed in the asset library are kept, and changed outputs are saved as new copies. Shared spaces don't offer Decompose.
- What you break down is for your own study. Rewriting should learn structure and delivery, not lift footage or lines. Get the creator's permission before using clips, keyframes or music in anything you publish or sell.
Next steps
- To turn a broken-down Bilibili video into your own content, read saving, breaking down and rewriting Bilibili videos.
- For more on decomposition, see how to break down a viral video. For why collecting matters at all, read the series overview, "Accumulation Is the Moat".
- Full reference: decompose videos and notes.
Applies to Beav desktop 2.9. Checked 2026-11-02.